
ECONOFROST’s Motor Blind Installation Instructions
Installing electric motor blinds is relatively easy.Once you’ve figured out where the first motor driven unit will go, the rest of the auxiliaries just follow in a sequence.
Below is an outline of the general installation instructions for the ECONOFROST motor blind series.
To assist you with your night cover installation we are also providing a set of instructions which you can download.
If you ever have any questions regarding the installation of the ECONOFROST brand of night covers, please give us a call (toll free in North America) at 1-800-519-1222 or at (250) 743-1222.
Electric Blind Cassette Installation Guide
Before You Start
1. For maximum efficiency and cost savings try to use as many 8ft or 12 ft units as possible in a case line-up or wall. this reduces the number and size of the gaps bewtween cassettes and covers the greatest linear length using the least number of units.
2. Be careful of any wiring inside the display case canopy and near the installation area or wires concealed behind the wall.
3. Where applicable the ECONOFROST covers should be sure installed in such a manner that the refrigerated cold air curtain remains behind the night cover (inside the case).
4. Remove all signage, boards and bag racks as required prior to install as applicable.
5. Avoid installing the ECONOFROST night covers near sharp edges or in positions where the fabric may be exposed to undue wear and tear.
6. Where applicable avoid installing the ECONOFROST covers where they will come in contact with the merchandise and shelving inside the case.
Installation Instructions – Electric Blinds
Step 1 : Evaluate the case layout, wall or ceiling mount area for the most symmetrical positioning of the units. Measure the opening to be covered to determine exact placement of the units.
Units may be installed on the case, ceiling mount or wall mount. Measure and mark location of the drive unit.
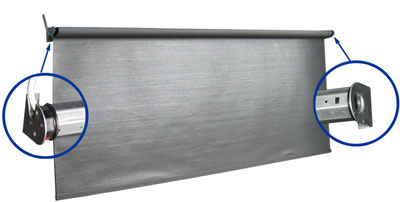
Step 2 : Install drive unit first starting with motor side bracket. Next, insert other end bracket onto the end of the first drive unit, then secure the bracket to the mounting surface.
Step 3 : Insert the slave unit coupling into the drive unit receiver ensuring the bottom profiles on each cover are hanging at the same length.
Repeat Step 2 for each additional slave unit and their associated brackets.
Everytime a new motor drive unit is installed the process is repeated from the beginning, from Step 1.

Disclaimer: These are illustrations of possible wiring scenarios. Each installation and wiring will differ based on the store requirements, the electrician and the night cover application.
Warning: To avoid fire, shock or death, turn off power at circuit breaker or fuse. Test that power is off before wiring. Use thes devices only with copper or copper clad wire. With aluminum wire, use only devices marked CO/ALR.
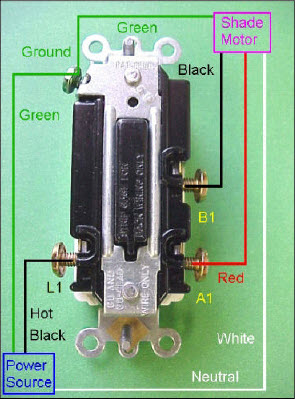
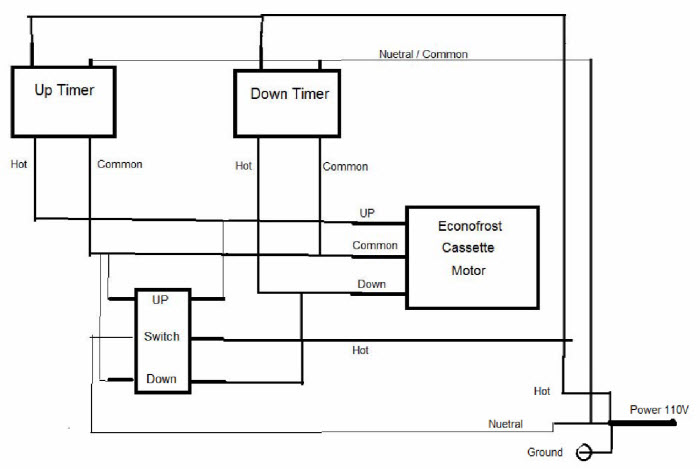
Connect wires per diagram as follows:
- Black (hot) wire from power source to the (L1) screw
- Black wire from the shade motor to the (B1) screw
- Red wire from the shade motor to the (A1) screw
- White (neutral) wire from the shade motor to the white (neutral) wire from power source
- Green or bare (ground) wires from power source and from shade motor to green hex screw, and then attach to a ground
Double Pole, Double Throw, Center Off.
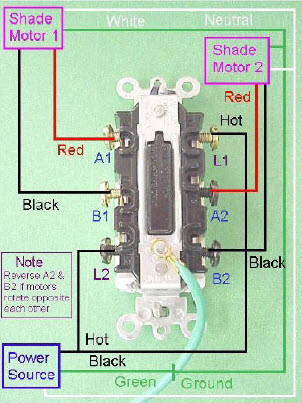
Connect wires per diagram as follows:
- Black (hot) wire from power source to the (L1) and (L2) screws (this can also be done by connecting the black (hot) wire to either (L1) or (L2) and using a jumper to connect (L1) and (L2) together)
- Black wire from the shade motor 1 to the (B1) screw
- Red wire from the shade motor 1 to the (A1) screw
- Black wire from shade motor 2 to the (B2) screw
- Red wire from shade motor 2 to the (A2) screw
- White (neutral) wire from both shade motors to white (neutral) wire from power source
- Green or bare (ground) wires from power source and from both shade motors to green (ground) wire attached to switch, and then attach to a ground
Contact us today if you have any questions regarding the electric motor blinds