
Econofrost 9000 Series – Installation Instructions
Installing the 9000 series is relatively easy. Once you’ve installed one or two cassettes, you can quickly finish an installation of a cassette in about a couple of minutes.
Below is an outline of the general installation instructions for the 9000 series retrofit cassette and the 9000 series non-cassette OEM version. We have also included re-tensioning instructions for the 9000 series.
To assist you with your night cover installation we are also providing a set of instructions which you can download.
If you ever have any questions regarding the installation of the Econofrost brand of night covers, please contact us immediately and we will be happy to assist you.

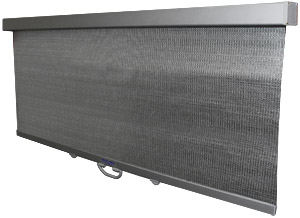
9000 Series Cassette
– English
9000 Series Non-Cassette
Re-tensioning – English
9000 Series Cassette
– Espanol
Econofrost 9000 Series Installation Guide
Before You Start
1. For maximum efficiency and cost savings, try to use as many 8-foot units as possible. This will allow you to cover the greatest linear length using the least number of units.
2. When installing the night covers, be careful of any wiring inside the display case canopy and within the installation area.
3. When installing the night covers, be sure to install the blinds in such a manner that the refrigerated cold air curtain remains behind the night cover (inside the case) as it was intended.
4. Be aware of any misting systems (produce cases) and be sure not to block access to the refrigeration controls. Try to avoid installing the night covers where they will infringe upon merchandise and shelving. Try to avoid installing the night covers near sharp edges or in positions that will expose the fabric to undue wear and tear.
5. Before starting, be sure to remove all signage, boards and bag racks as required.
Installation Instructions
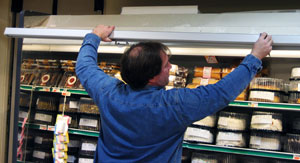
Step 1: Evaluate the case layout for the most symmetrical positioning of the units. Measure the distance from one end of the case to the other – install as many 8-foot units in parallel succession as possible.
Step 2: Lay the units out on the return air grill along the length of the case. This provides an accurate picture of the exact positioning of the units, ensuring a uniform installation.
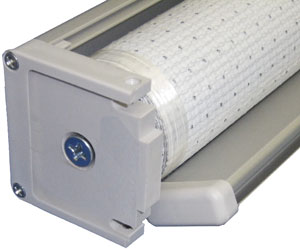
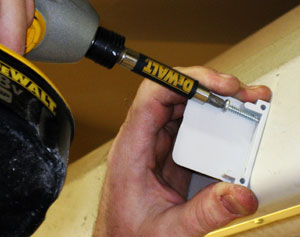
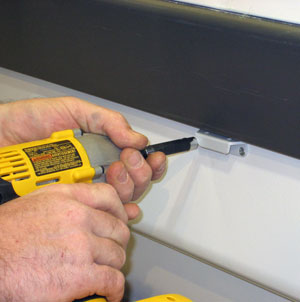
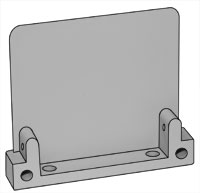
Step 3: Using a pencil/scribe, mark the left hand side (LHS) of the case canopy where you will mount the first bracket. Slide the endcap tab piece out of the mounting bracket & mark the LHS of the case where you will mount the bracket. Use 2 x #8-3/4″ self drilling/self tapping screws to secure this endcap bracket.
Step 4: Hold the unit & use the level tool to verify that it is perfectly level then secure the right hand side (RHS) bracket.
Step 5: Gently place the cassette unit mounting bracket on to the LHS endcap tab piece, move along the cassette mark its position where the RHS endcap bracket will be installed. Mark its position on the display case. Remove the night cover and install the RHS endcap tab piece just like you did with the LHS.
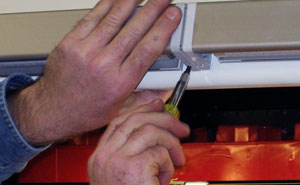
Step 6: Slide the entire cassette unit into place – the mounting brackets should be flush against the endcap tab piece. Before you secure the set screws on the top side, check that the set screw holes are aligned & that the unit is level (ladder required).
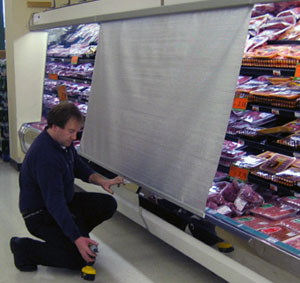
Step 7: Before installing the next unit, test the retraction of the night cover by pulling it down to the bumper and releasing it.
Standard factory-set retraction time is 3-5 seconds. If unit has lost tension, please refer to the re-tensioning instructions.
*If a hook-for-handle is required to secure the cassette’s handle to the bottom/bumper of the display case follow Step 7.1. Otherwise proceed to Step 8.
Step 7.1: Installing a hook on the case bumper. To install the hook-for handle (optional), pull the cassette down by the handle in a straight and even manner. Mark the handle position in the middle of the case bumper. Using the drill, attach the hook to the case bumper and use your level to ensure it is even.
*When installing subsequent units, align all hooks at the same level.
Step 8: Repeat process with the remaining units ensuring flush and level mounts, again testing the tension of each unit prior to installing.
Tip: The magnet fasteners are easily removed with a bottle opener-like tool.
Econofrost 9000 Series Re-tensioning Guide
Econofrost night cover units come factory pre-tensioned. Occasionally during transport, the night cover may lose its original tension. Prior to installing the cassettes, the installer should confirm the tension is set. Standard retraction time is 3-5 seconds for complete retraction of the night cover.
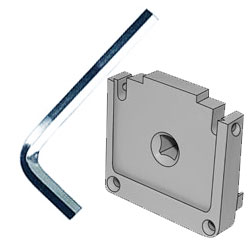
Tools required: Phillips head screwdriver, step ladder, 5mm Allen key
Re-tensioning Instructions
Removing a night cover that is currently installed
1. Remove the set screws on both mounting brackets.
2. Slide off the cassette unit (mounting endcap tabs remain affixed to the case).
Setting spring tension using Allen key tool
Step 1: Identify LHS mounting bracket with the safety locking screw. The locking screw should only be removed to adjust tension. Remove screw.
Step 2: Once the screw is removed a recessed hex shaped hole should be visible. This is where the Allen key fits.
Step 3: Insert the Allen key & push in until it unlocks the setting & releases the spring tension. Maintain pressure on the recessed spring, turn the hex key clockwise 18-25 times.
Step 4: Once the expected tension is reached, carefully bring back the spring insert to seat it in its original channel setting by releasing the pressure on the Allen key.
Replace the safety locking screw in the center of the hex key hole.
Caution: Be careful not to push the spring insert back into the channel.
Step 5: Slide the night cover back onto endcap mounting tabs (affixed to the display case). Secure the set screws in the top that will once again hold the unit in place.
Unit is now fully tensioned with retraction time of 3-5 seconds.
Questions about the 9000 Series?
Contact us today and let us help!